Create a new email address

STEP 4: create a new Email address 

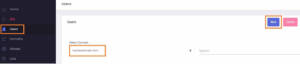
  1. In the Admin Panel, in the left side menu, click on the Users 
  2. On the Userspage, select the domain you just added from the Select Domain drop-down and click the New

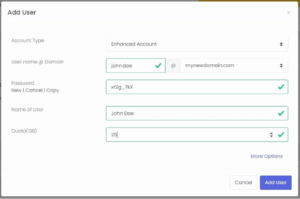
  1. In the new pop-up window, fill in the details for your new email address:
  • Account Type: choose Basic or Enhanced, depending on what type of mailbox you have added to your subscription at Step 0.
  • User name: your desired email address (before “@” sign). You can use letters, numbers, and dots; special characters are not accepted.
  • Domain: choose the domain you just added from the drop-down.
  • Password: must be a strong password; minimum 8 characters and must include: at least one lower case, one upper case character, one number, and one symbol. You can generate a random password by clicking on the New button under the Password text – don’t forget to Copy your new password to the clipboard.
  • Name of User: your full name
  • Quota: the size of the mailbox, in GB; you can type in any value between 0.1 and 100. The size must be smaller than the available storage space.

You can also change optional settings for your new email address by clicking on the More Options link.

  • Language: the default is English.
  • 2Factor Auth: if you want to allow a second layer of authentication, called Two Factor Authentication, for this email account – the default is Allowed.
  • Localization: the default timezone for this email account.
  • Date Format: the default format for dates.
  1. Finish adding this new email account by clicking the Add Userbutton.

Webmail – mark email as legit (Not Spam)

Webmail – mark email as Spam or block a sender

CalDAV / CardDAV allow delete via Synchronization

Webmail – Signature: create, load and set one as default

Webmail – Send as Alias

Webmail – Folders management

Webmail – How To

CalDAV Synchronizer Setup

Manage Extensions

Disabling local delivery to an account

How to avoid forged e-mails?

ownCloud – free file storage and sharing on the cloud

Configure Incoming E-mail Rules

Share E-mail Folders

Track Remote Deliveries

Retrain Messages

Set Spam filter preferences and manage spams

Whitelist or Blacklist an e-mail address

Set Vacation Message

Forward Messages

2FA – Two-factor authentication for mailbox

Change your mailbox password

User Features – How To

Logs

Set Branding

Filtering: Whitelist / Blacklist

Manage Smart Lists

Manage Lists

Manage Alias Email

Manage Alias Domains

Manage Domains

Manage Users

Security

Manage Sub-Admins

Change Admin password

Admin Panel Features – How To

Setup e-mail on Mozilla Thunderbird

Setup IMAP e-mail on Android

Setup IMAP e-mail on iOS

Setup e-mail on Outlook

Setup IMAP on e-mail clients

Autodiscover

Servers & Ports

Webmail client

DNS Configuration

STEP 3: Setup the DNS for your domain The next step is to specify to the Interne

Configure a new e-mail address

Set up your email client

Send your first email

Step 5: Send your first email  Now that you have set up your email address, you

Setup DNS for your domain

STEP 3: Setup the DNS for your domain The next step is to specify to the Interne

Create a new email address

STEP 4: create a new Email address  In the Admin Panel, in the left side menu, c

Add your domain

STEP 2: ADD YOUR DOMAIN In the Admin Panel, from the left side menu, click on th

Log in to the Admin Panel

STEP 0: SIGN UP  for a sDominio email service and you will receive an email with

Get started

sDominio_WIKI

Chat Icon Close Icon